Use vimdiff to resolve git/subversion/mercurial merge conflicts effectively
You can jump to No description for this link section at the end of this article.
I use git as an example of version control software. But you can use any other version control software instead.
The reasons to use vimdiff to do the merge?
- It's free (vim)
- It works on any OS
- It works in shell
- Keyboard only
Setup
Setup vimdiff (OPTIONAL)
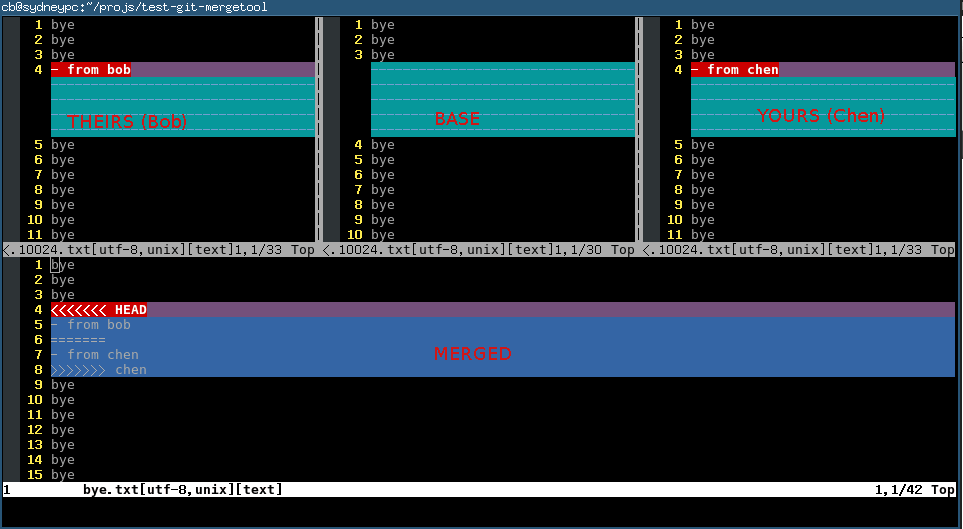
The vimdiff as a merge tool will display several buffers to show YOURS/THEIRS/ORIGINAL code.
First, add following code into your ~/.vimrc,
set laststatus=2 "show the status line
set statusline=%-10.3n  "buffer number
The purpose of above two lines is to display buffer number at the status line of vim. It's OPTIONAL. You don't need see the buffer number if you are familiar with the all the buffer's position. The left top is buffer number 2. The middle top is buffer number 3. The right top is buffer number 4.
Second, if you know the buffer number, you can use hot key like ",2" (press comma first, then press two key as quickly as possible) to pull change from buffer number 2. Add below code into your ~/.vimrc to set up hot keys:
map <silent> <leader>2 :diffget 2<CR>
map <silent> <leader>3 :diffget 3<CR>
map <silent> <leader>4 :diffget 4<CR>
Setup git
Run below commands in shell,
git config --global merge.tool vimdiff
git config --global mergetool.prompt false
Usage
Create a "hello world" project
I setup a "hello world" project at https://github.com/redguardtoo/test-git-mergetool for your practice.
It has three branches "master", "bob", and "chen",
git clone https://github.com/redguardtoo/test-git-mergetool.git
cd test-git-mergetool
git checkout -b bob origin/bob # create local mirror of bob branch
git checkout -b chen origin/chen # create local mirror of chen branch
Bob and Chen has edited same files. So please merge branch "bob" into "master" at first. Then merge from "chen". The merge conflicts will be created.
git branch # double check that we got three local branches: master, bob, chen
git checkout master # set master branch as main branch
git merge bob #this is ok, because bob is the first one to merge changes
git merge chen # now some conflicts created because Bob has already edited and merged same files
Resolve merge conflict
Now start merge tool,
git mergetool
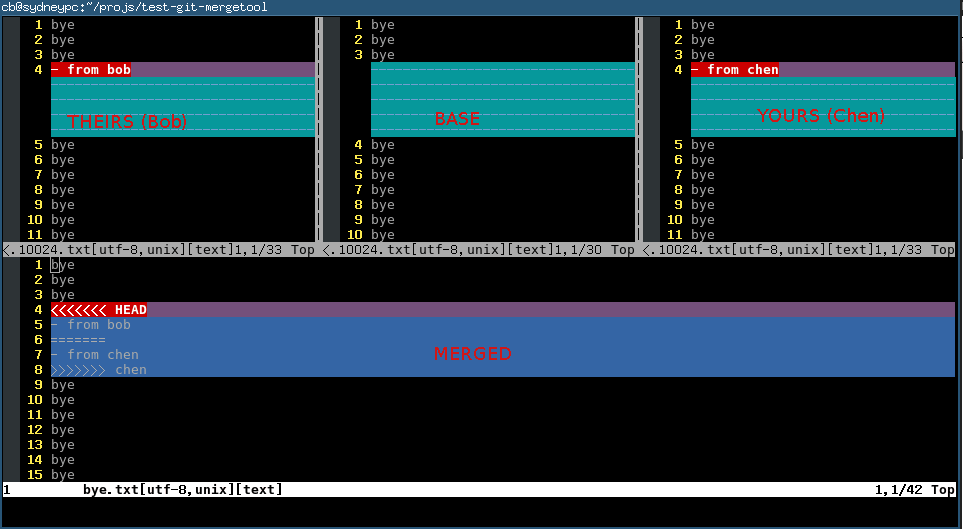
Git will invoke vimdiff with the following window layout. There are four buffers in this layout:

Here is the explanation of each buffer:
| Buffer | Explanation | Buffer Number |
|---|---|---|
| THEIRS (LOCAL) | contents of the file on the current branch | 2 |
| BASE | common base for the merge | 3 |
| YOURS (REMOTE) | contents of the file to be merged. | 4 |
| MERGED | The file containing the conflict markers. You need edit and commit this file. | 1 |
Some people name THEIRS and YOURS buffer to LOCAL and REMOTE buffer. That's fine because names are just names. The point is that the top middle buffer is the BASE one which contains the original code before Bob and Chen committing any code. And the bottom buffer is the mess which contains resolved/unresolved conflicts where you actual editing work happens.
You could press hot key ,2,
Then you pick the content from THEIRS buffer (the top left buffer). It means you will use the Bob's code and discard Chen's code in MERGED buffer.
You could press hot key ",3", Then you pick the content from BASE buffer (the top middle buffer). It means you will discard either Bob's code or Chen's code in MERGED buffer.
You could press hot key ",4", Then you pick the content from YOURS buffer (the top right buffer). It means you will use Chen's code and discard Bob code in MERGED buffer.
Or you can edit the content directly in MERGED buffer. Anyway, git only care about the file binding to MERGED buffer. Any other buffer will be ignored by git.
You can use hot key [c and ]c to navigate to previous/next conflict (including the conflict resolved by git automatically) in current file which is binding to MERGED buffer.
After finishing editing of the conflicting file in MERGED buffer, you can use hot key :xa to exit vimdiff. Git will open next conflicting file vimdiff automatically.
When you have resolved all the conflicts, follow the hint of git to commit your changes.
Tips
- fugitive.vim (https://github.com/tpope/vim-fugitive) can do this too. Actually it can do much more git stuff than merge. I cannot write this article without reading its code
- You can use Emacs to do the similar job (http://stackoverflow.com/questions/1817370/using-ediff-as-git-mergetool). For me, Emacs start up time is too much for this task. Some people use
emacsclientwhich has other overhead I don't like - If you prefer GUI, use command line `git mergetool -t gvimdiff` instead
- The
:diffgetcommand is valid if and only if there are MARKED conflicts in merged buffer. If there is NO marked string like ">>>>" or "<<<<<" around current change (you can jump to previous/next change by press[cor]c), it means the git have automatically resolved potential conflict for you. Reviewing is still wise because git is not as smart as human - If you prefer navigating between the unresolved conflicts only, you can install Tim Pope's vim-unimpaired and use hot key "[n" and "]n" to do the navigation
- I map
[nand]nto more handy hot keys:
map ]] ]n
map [[ [n
You can use command line like "git mergetool -t vimdiff" to start vimdiff from git.
So the minimum set up is adding three lines of code into your ~/.vimrc:
map <silent> <leader>2 :diffget 2<CR> :diffupdate<CR>
map <silent> <leader>3 :diffget 3<CR> :diffupdate<CR>
map <silent> <leader>4 :diffget 4<CR> :diffupdate<CR>
Then you can press hot key ",2" ",3" ",4" in vimdiff to pull change from top three buffer. The bottom buffer is for editing the code with markers which is actually your only work space.
":help vimdiff" for other hot keys.
#+image/git-merge-tool-nq8.png 
subversion/mercurial
Until now I'm focusing on how to tweak the vimdiff UI because the git has already setup the basic vimdiff layout for us. So we just follow the Git layout in other VCS.
subversion
Insert below code into ~/.subversion/config:
[helpers]
merge-tool-cmd = vimdiff.sh
Content of vimdiff.sh
#!/bin/sh
#

# Step 1:
# When you get following options during svn merge command, select option 'l'. This is to launch external tool to resolve conflicts.
#
# Conflict discovered in 'main.h'.
# Select: (p) postpone, (df) diff-full, (e) edit,
#        (mc) mine-conflict, (tc) theirs-conflict,
#        (s) show all options: l

# Step 2: Now vim will be opened in diff mode with 3 files - mine, theirs and merged. Make the required changes in the merged file, and do save and exit (:xa).

# Step 3:
# Now below options will appear again, select 'r' (to accept the merged version) now.

BASE=${1}
LOCAL=${2}
REMOTE=${3}
MERGED=${4}
WCPATH=${5}

# copied from from git's vimdiff script
# @see https://github.com/git/git/blob/master/mergetools/vimdiff
vimdiff -f -d -c 'wincmd J' "$MERGED" "$LOCAL" "$BASE" "$REMOTE"
mercurial
Insert below code into ~/.hgrc:
[ui]
merge = vimdiff
[merge-tools]
vimdiff.executable = vim
vimdiff.args = -f -d -c 'wincmd J' "$output" "$local" "$base" "$other" +close +close